Saturday, April 25, 2009
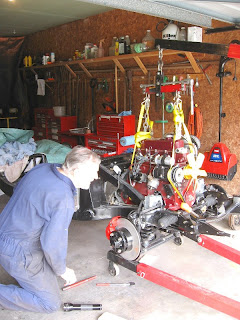
Gearbox and Engine Installed
I got the gearbox in by myself. My brother-in-law Fred helped me install the engine. It took us four hours to finish the job. If you know what you are doing it can be done in an hour.

Saturday, March 21, 2009
Windshield Wiper Motor
Gearbox Rebuild
These pictures illustrate some of what is involved in rebuilding the MGA gearbox. All parts except the gears were renewed.


It looked to be a formidable task at the beginning. But once you get into it everything makes sense. I assembled and reassembled it so many times, checking out clearances, etc. that I think I could now do it blindfolded.

Must have been hard shifting with this mess in the shift lever.


The ball bearings on the input shaft and mainshaft were replaced with new. The lay shaft and needle bearings were replaced. The layshaft and mainshaft thrust washers were replaced. All seals including the speedometer drive seal were replaced. Rusted parts were sandblasted, everything else was cleaned in solvent.

Sunday, February 22, 2009
Clutch-Gearbox
 As a start to rebuilding the gearbox I did the clutch slave cylinder and throwout fork first. As usual, everything was dirty, worn out, and seized.
 Notice the wear in in the following picture in the old clevis pin and clutch fork pushrod. These were fixed with new parts. The clevis pin end of the clutch fork was also worn to an oval. This is a 5/16" hole but was badly oval. I drilled it out to 3/8" and then pressed in a 3/8" OD X 5/16" ID bushing, good as new.
Subscribe to:
Comments (Atom)


